The Mystery of the Antique Brass Hardware: How Do We Prevent Corrosion from Destroying the Irreplaceable?
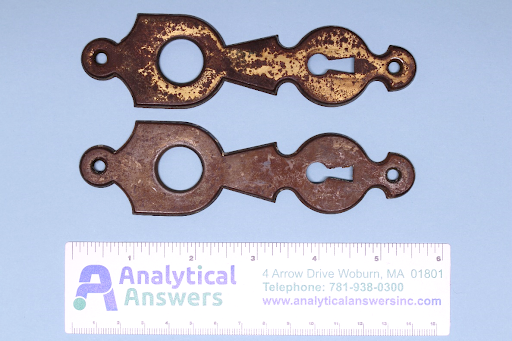
We recently performed an analysis involving a home restoration project. The analysis involved not just any home restoration product, but rather a restoration of antique hardware as part of an overall restoration of an historic home. In this particular hardware scenario, the paint that the restoration company applied to coat some brass-colored bezels did not adhere to the bezel surface.
The restoration company brought us the failed painting attempt. Specifically, they brought us several bezels to try to understand why paint did not adhere to them. As a historic restoration, the paint that was going to be applied was a powder coat paint that did not adhere to the metal after cleaning. The question was: what was the true cause of adhesion failure?
There were only a limited number of bezel pieces available, and because this was a historic scenario, we were not allowed to remove pieces of the sample. Thus, we needed to learn what was happening with the materials non-destructively.
And why would you care about restoring old bezels? The lessons learned from this analysis apply to many situations and needs, one of which occurred at a terminal at Boston’s Logan Airport. A few years after reconstruction of one of the terminals, things were no longer looking new, as corrosion and degradation of material surfaces had taken over. Another common scenario with a broader range is bridge corrosion. Metal-clad buildings, commercial property fixtures, metallic structures in hostile environments, and of course, the historic or national artifact restorations are all scenarios in which unique corrosion challenges present themselves.
Non-Destructive Analysis
We could not destroy the bezel sample, but one of the things we could do is make a small scratch to expose the underlying metal. A few areas of the bezel looked like the metal was brass, but when we scratched the surface in a nearby corroded area, the metal had a silvery rather than brass coloration. Subsequently, it appeared that the base metal is not a brass.
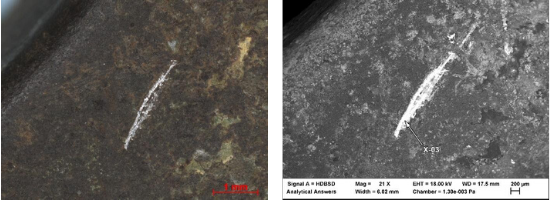
When we examined the bezel in the electron microscope and performed EDS analysis to understand the elemental composition, we saw, that the base metal is a type of steel rather than brass. Since the brass coloration is present, we felt that the part may have had a brass plating, and that perhaps it had been corroded away.
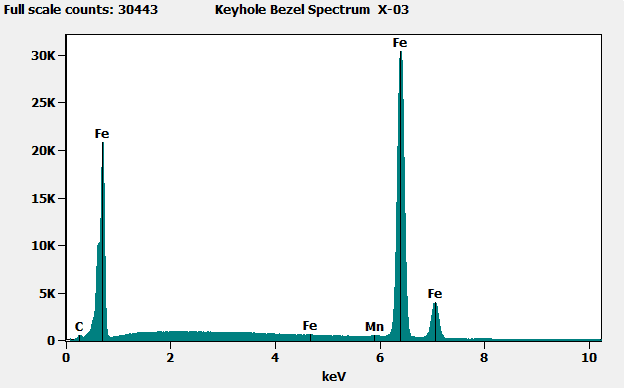
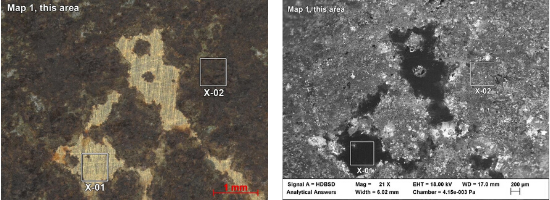
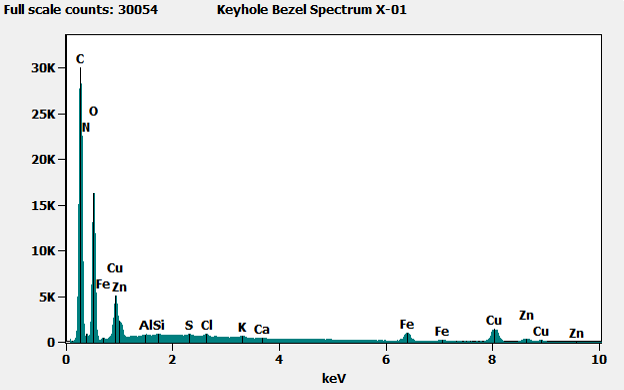
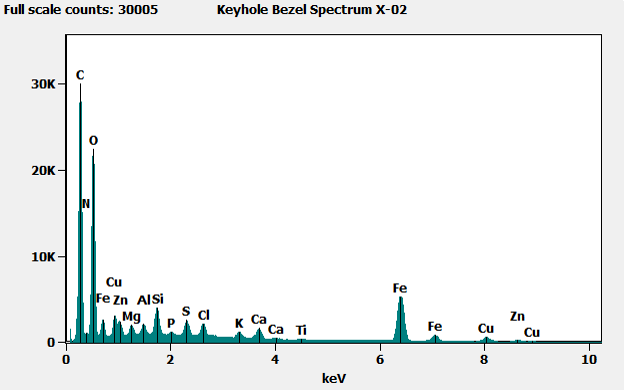
When we analyzed the brass-colored region (shown in x-01 below) we found mostly carbon (C), with small amounts of copper (Cu) and zinc (Zn), indicating brass covered by an organic material – likely the lacquer coating applied to most brass parts to prevent oxidation and corrosion. When we analyzed the corroded region (shown in X-02 below), we found iron from the base metal, along with other elements including some potentially corrosive materials. At the edge of the corroded area, we also saw these potentially corrosive elements, as well as some copper and zinc from the brass.
Multiple Elements in Different Parts of the Sample Reveal the Root Cause of the Issue
We did an analytical double take here to look at not only what elements were present, but also how they’re distributed across the sample by collecting a digital x-ray map. At each point as we acquired the digital images, we also acquired the spectra from each of those points, to understand what the composition is at each point in the image.
We displayed those elemental distributions all at once, but that can be a bit overwhelming sometimes, so we narrowed the element list down to a few of the most critical elements in this particular analysis.
In doing so, we saw carbon distributed largely in those areas that appear as dark regions in the back scattered electron image. We detected sulfur and chlorine, two of perhaps the most suspect corrosive types of elements – especially in the presence of moisture such as summer humidity – and their location on the sample matched up quite well with the iron of the base metal.
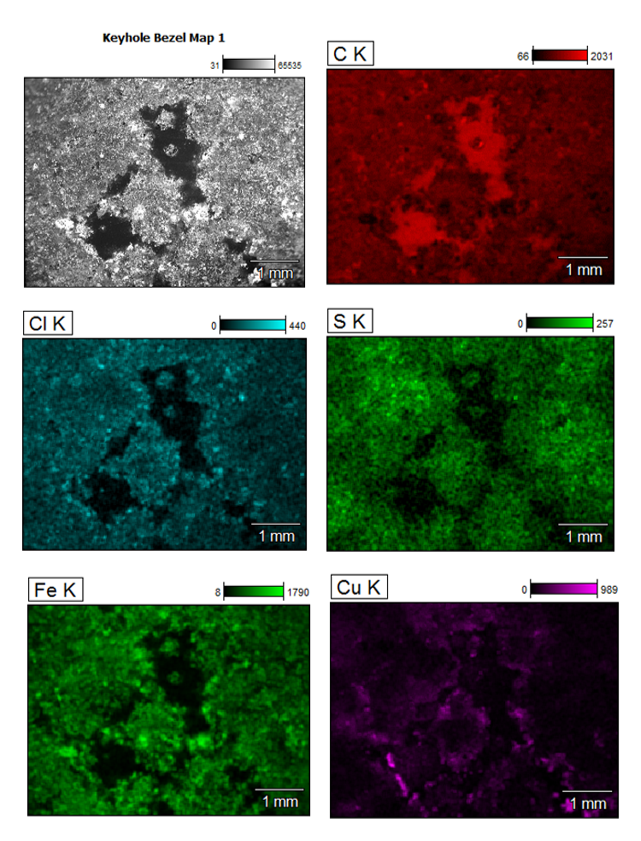
The elemental maps also showed that areas that appeared to be brass in the optical image contained copper (from the brass) around areas of the perimeter. That would seem to indicate that the corrosion undermined exposed edges of the lacquer.
Based on this analytical information, we concluded that the bezels were made of a stamped sheet steel. The presence of zinc and copper, and that ‘brass’ coloration that we saw, were remnants of a brass plating that was applied to the bezel surface. The protective lacquer may have initially been scratched during normal maintenance, such as polishing. That allowed other corrosive elements to attack the metal over time.
Results of Corrosion and Preventing Issues
Once that lacquer was breached, the opportunity existed for galvanic coupling between the steel substrate and the brass plating to drive the corrosion, as a 200 millivolt potential exists between those metals. In conditions such as summer humidity, normal indoor humidity levels can be high enough to help drive that reaction. Before a successful paint coating could be applied, all corrosion products and remnants of the brass plating had to be removed, exposing the base metal for painting.
The bezels were successfully restored using an antique bronze powder coat, which was applied using electrostatic application methods. This process relies on
Galvanic coupling and the potential applied to the bezels during the painting process. It produced an excellent finish after the heating phase of the powder coating, which flows the paint and allows complete coverage, even around corners and into intricate patterns that might be part of the product.
Conclusion: Why Multiple Analyses Matter – Not Just Any Answer, The Answer
Depending on the materials and the application, one or more analysis methods may be needed to fully understand a problem. A double take may take the form of multiple analytical techniques or even multiple aspects of a particular analytical technique, as with elemental mapping compared to point or regional analyses. An example of multiple technique double take in this example may use additional analytical techniques such as FTIR analysis to understand the molecular composition of organic materials found in or on a sample that affect its behavior or characteristics. The need for a double take may be obvious during the discussion of the problem or may only become evident as the results of an initial analysis are obtained.
Our approach to quotations and analysis is always to provide the most comprehensive analysis, not only to get you an answer, as we showed originally, but to get the answer, and also to get that answer when you need it.